This guide walks you through it module by module, in the right order, from your first login to having agents replying, your CRM organized and your reports running on their own. No technical knowledge needed — and your progress is saved right here.
Follow the order of the phases. Each module finds what it needs already in place from the previous one: channels first, then the CRM, then the agents that use both.
You don't have to do it all at once. Each module stands on its own: stop at the end of any phase and pick up where you left off — your progress is saved in this browser.
Only do the modules in your plan. If a module doesn't appear in your side menu, it's not in your plan: skip to the next one.
The "Done when…" checkbox in each module is your verification: if that's true, check it and move on with confidence.
The master checklist at the end shows your full progress — and it checks itself off with whatever you've already completed.
Phase 0 · 15 minutes
Your account
Before connecting anything: the platform needs to know who you are, what your brand looks like and who is on your team. Everything else inherits this.
01
First login and company profile
Where: beta.hapee.ai → menu Settings → Company profile
Your logo, colors and details show up in quotes, emails, forms and reports. Loading them first saves you from redoing pieces later.
Before you start
Invitation email from HapeeLogo as a PNG (transparent background ideal)Company details
Steps
Open the welcome email and sign in to beta.hapee.ai with your username. The system will ask you to create your permanent password on your first login.
Go to Settings → Company profile and fill in your name, tax ID / legal name, website, phone and address.
Upload your logo (and its white version if you have one: it's used on dark backgrounds).
Check your profile photo and name in your personal account: it's what your customers will see when the team replies.
Pick your theme: the moon button 🌙 in the top bar switches between light and dark mode. It's a per-user preference — everyone picks their own and the platform remembers it. The language is also changed per user, at the bottom of the side menu.
Done when… you sign in with your own password and your company logo shows up in the profile.Check it and your progress is saved in this browser.
02
Your team inside Hapee
Where: Settings → Team
Everyone with their own access: that way messages, tasks and sales are assigned to someone by name, and nobody shares passwords.
Before you start
Names and emails of your teamDecide who administers
Steps
In Settings → Team, invite each person by email.
Assign the role: administrator (configures and sees everything) or member (runs the day-to-day).
Ask each person to accept the invitation and create their password.
Done when… every person on the team signs in with their own username.
Heads up: don't share one login among several people. Everything Hapee measures per person (replies, tasks, sales) stops being useful if two people use the same account.
Phase 1 · 30 minutes
Connected channels
The heart of Hapee is that all your channels land in a single inbox. Connect them before creating agents: an agent without a channel has nowhere to talk.
03
WhatsApp
Where: menu Conversations → WhatsApp
The channel where Latin America buys. Hapee connects to the official WhatsApp Business API: unlimited messages per conversation, no phone that has to stay on, and no risk of being banned for using unofficial apps.
Before you start
A number for WhatsApp Business (can be a new one)Admin access to your Facebook/Meta page
Steps
Go to Conversations → WhatsApp and follow the connection wizard with your Meta account (it will ask you to log in to Facebook and authorize the number).
Verify the number with the SMS code Meta sends.
Complete the business profile: photo, description and hours — it's what customers see when they open your chat.
Send yourself a test message from another phone and confirm it shows up in the Inbox.
The rule you need to understand: the 24-hour window
Official WhatsApp works on a simple rule: when a customer writes to you, a 24-hour window opens in which you can reply with whatever you want. After those 24 hours —or if YOU want to write first— you can only start with a template approved by Meta.
Situation
What you can send
Customer wrote < 24 h ago
Any free-form message: text, photos, audio, documents. This is where your agents operate.
Customer wrote > 24 h ago
Only approved templates (the conversation "reopens" if they reply).
You start the conversation
Only approved templates. Workflows that send "cold" WhatsApp messages need them.
Create your 3 base templates from day one and submit them for approval (it takes hours, sometimes a day). Templates can't be aggressively promotional — Meta rejects them; write them as customer service. You can start from these:
# 1 · Welcome
Hi {{nombre}}, thanks for reaching out to [your company] 👋
Tell us how we can help and we'll get back to you right away.

# 2 · Appointment reminder
Hi {{nombre}}, a reminder of your appointment on {{fecha}} at {{hora}}
with [your company]. If you need to reschedule, just reply here.

# 3 · Quote follow-up
Hi {{nombre}}, were you able to review the quote we sent you?
We're here for any questions — and if you'd like, we can go over it together
on a quick call.
Done when… you message the number from your personal phone, the message appears in the Hapee inbox, and your 3 base templates have been submitted for approval.
Heads up: if your number is already on the regular WhatsApp app, you need to release it first (delete the account in the app). If this step feels tricky, this is exactly the moment to message us: we'll do it with you on a short call.
04
Omnichannel inbox
Where: menu Conversations → Inbox
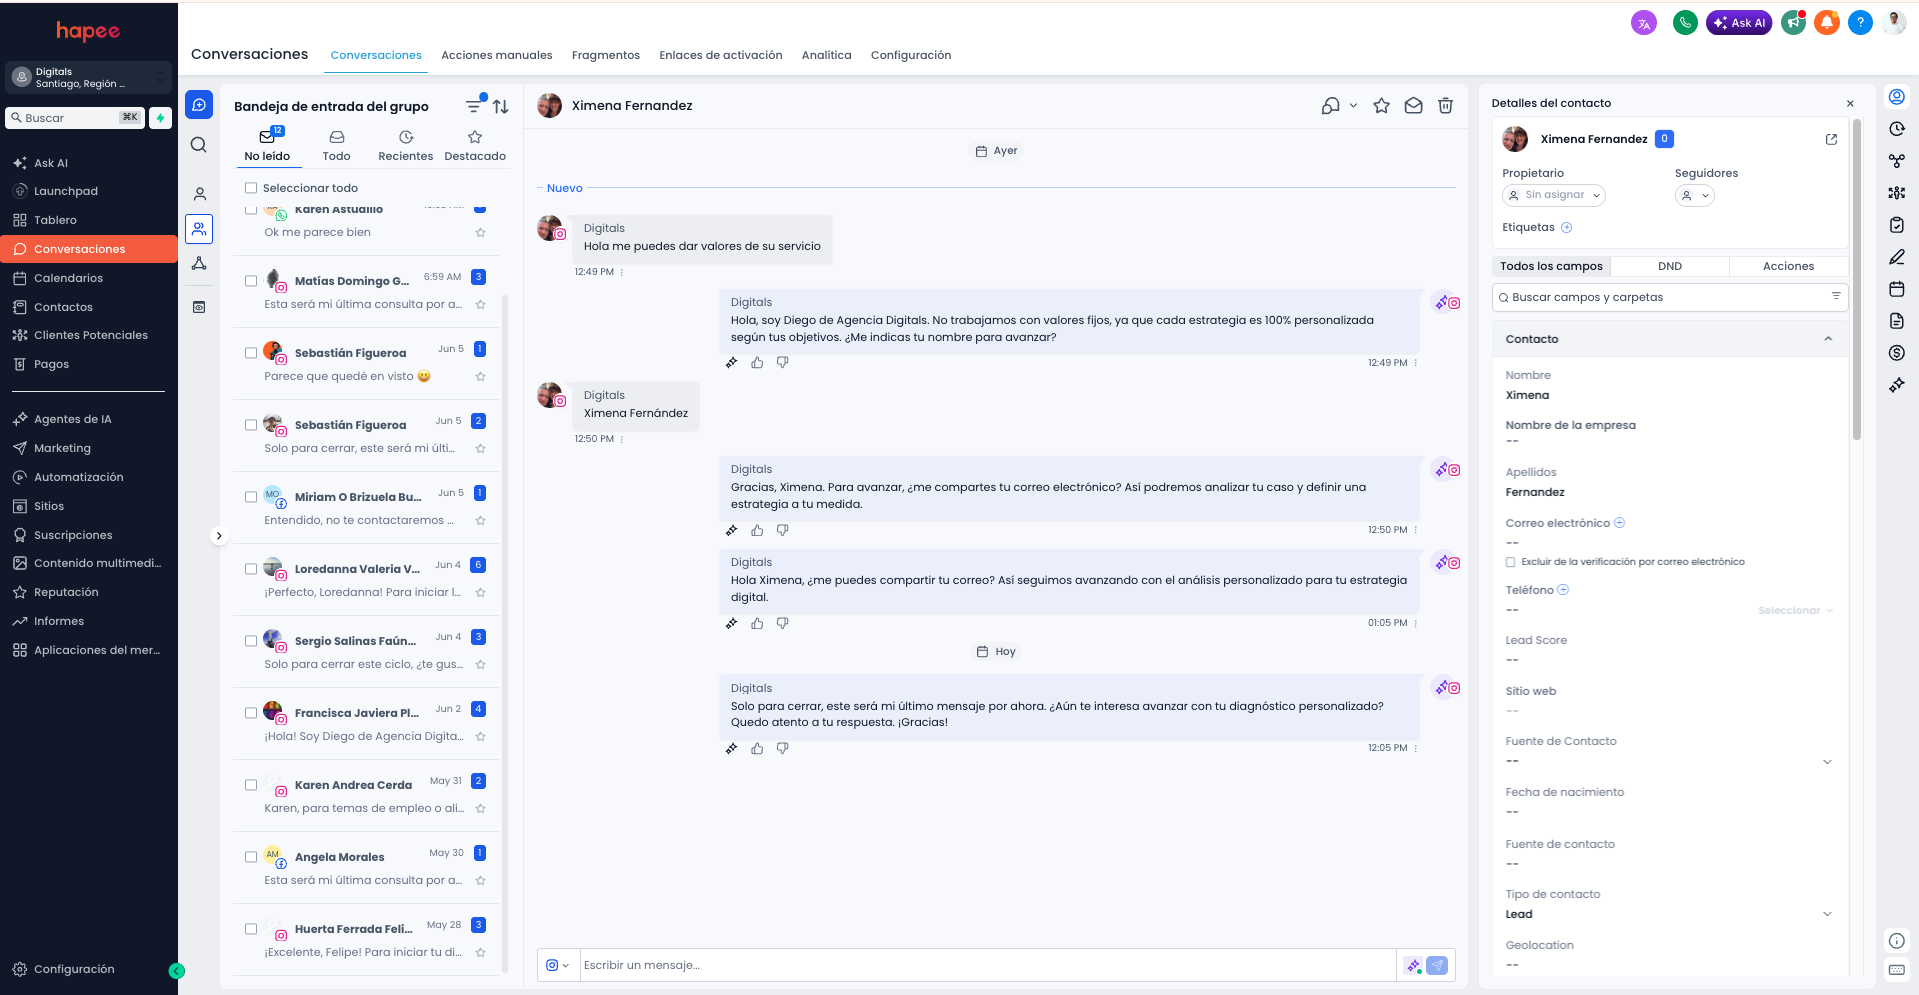
The omnichannel inbox: each conversation with its channel, its owner and the contact record alongside.
WhatsApp, Instagram, Facebook, email and your website chat, in a single list. Each conversation can be assigned to someone on the team, labeled and turned into a pipeline deal without leaving the page.
Steps
Open the Inbox and connect the channels you use: Instagram and Facebook are authorized with your Meta account; email, with your mailbox.
Agree with your team on the golden rule: every conversation gets assigned to an owner as soon as it's first answered.
Create your first labels (in Settings → Labels): for example "quote", "after-sales", "urgent". A few clear ones work better than many.
Test the full flow: incoming message → assign → reply → label.
Done when… messages from your channels reach the inbox and the team replies from there, not from their phones.
Phase 2 · 40 minutes
Your CRM, organized
This is where the business's memory lives: who each customer is, where each sale stands and what needs doing today. AI agents read and write on top of this data, so it's worth keeping it clean.
05
Contacts and companies
Where: menu CRM → Contacts and CRM → Companies
Everyone who writes to you gets recorded with their full history: conversations, deals, emails and notes. Companies group their contacts.
Before you start
Your current list in Excel/CSV (if you have one)Columns: name, phone, email
Steps
If you're coming from a spreadsheet, use the import in Contacts: upload the CSV and match the columns to Hapee's fields.
After importing, check 5 random contacts: name spelled correctly, phone in full format (+56 9…), email without spaces.
In Settings → Properties, add the fields specific to your business. AI agents can fill them in by chatting. Examples by industry — real estate: neighborhood of interest, bedrooms, down payment available, first home yes/no · clinic/health: insurance, treatment of interest, urgency · e-commerce/retail: size, favorite category, last purchase · B2B services: company size, job title, estimated budget, renewal date (the latter enables the renewals workflow in module 13).
From any conversation in the inbox, check that the contact is created automatically on the first message.
Done when… you search for a customer by name and their record shows their details and their latest conversation.
Heads up: import once, and do it right. Two imports of the same spreadsheet create duplicates that are hard to clean up later.
06
Deals pipeline
Where: menu CRM → Deals · Pipeline
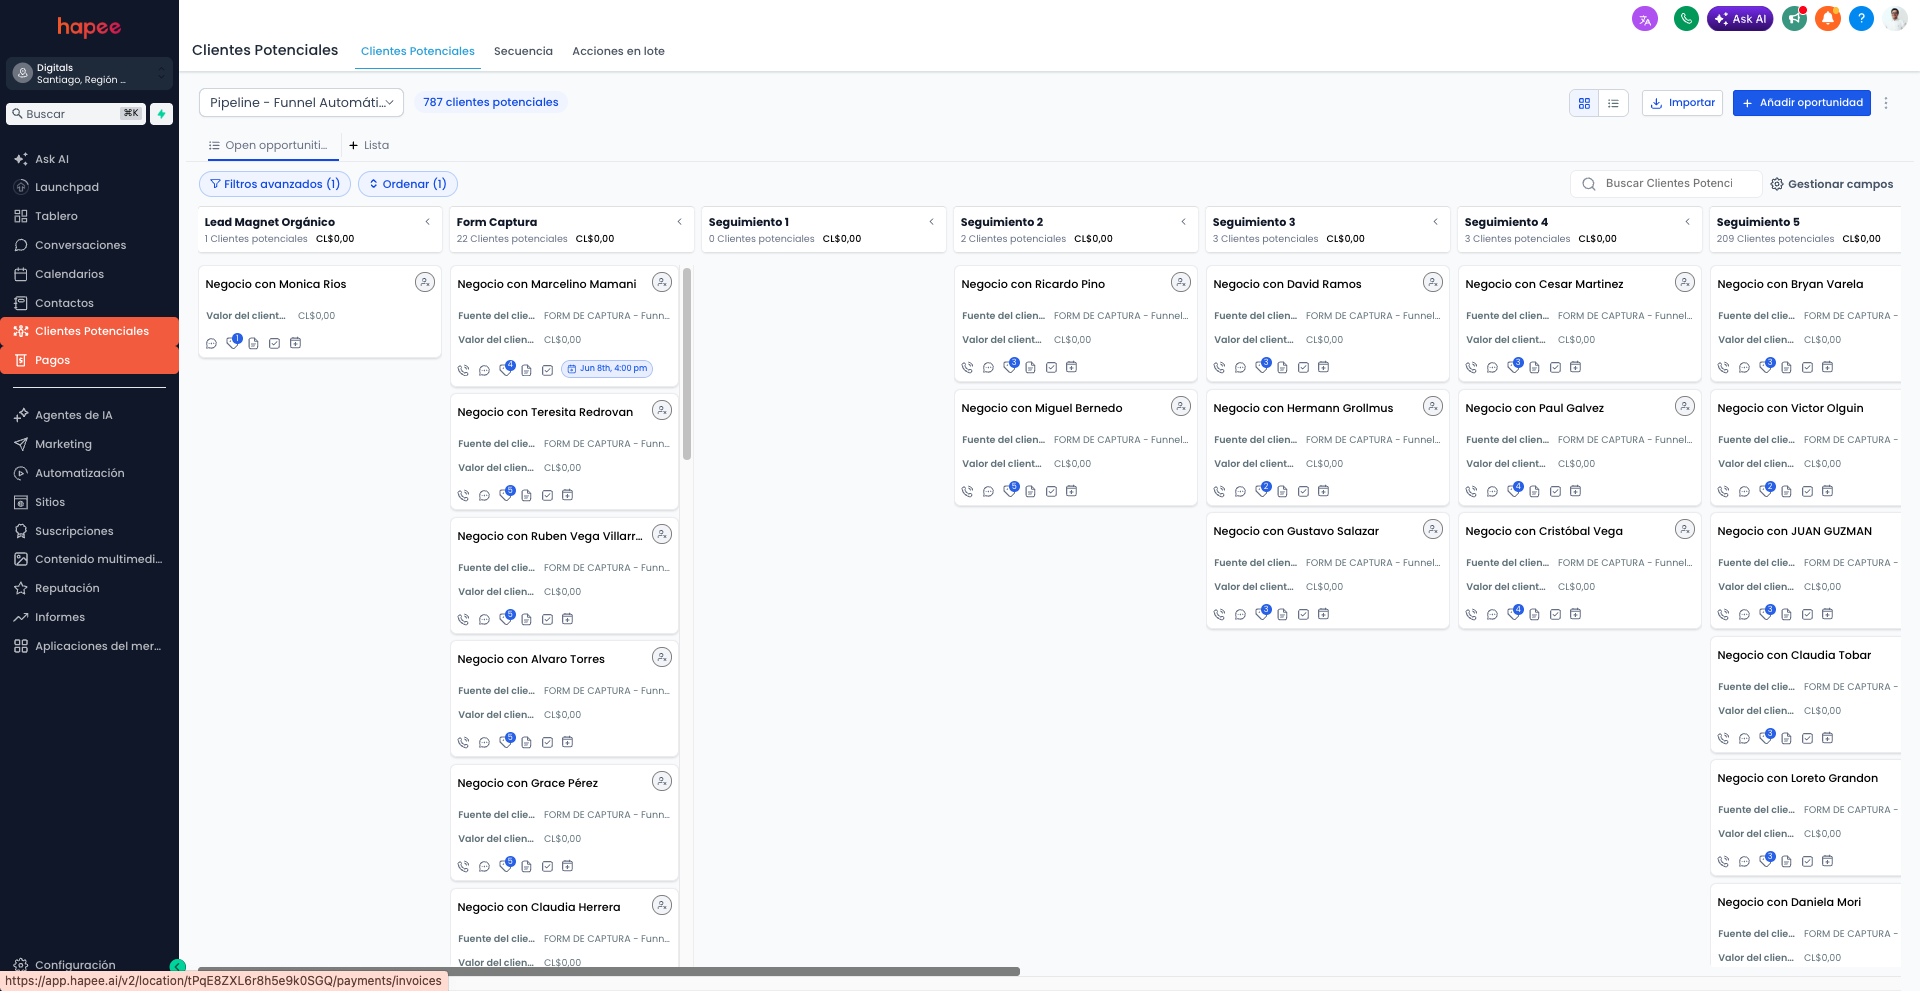
The sales kanban: each column a stage, each card a deal with its amount.
Your sales in columns: from "new lead" to "closed." Seeing a full pipeline means seeing how much money is in play and where it's getting stuck.
Steps
Define your stages using the names of YOUR real process. Rule of thumb: between 4 and 6 stages; more than that and nobody moves cards.
Put an amount on every deal when you create it, even an estimate: a pipeline without money is just a pretty list.
Create your first 5 real deals — the ones you currently have in your head or in a notebook.
Agree on a weekly ritual with the team: one pass through the pipeline, moving cards and noting the next step for each.
Done when… the pipeline shows your real sales in progress and the total amount they add up to.
07
Calendar and scheduling
Where: menu CRM → Calendar
A calendar connected to Google: your meetings sync on their own, customers can book your open slots, and the AI Meetings notetaker knows which meetings to join.
Steps
Go to Calendar and connect your Google Calendar (Google authorization, two clicks).
Ask each person on the team to connect theirs — each one their own.
Set your availability (the days and hours you accept meetings).
Schedule a test meeting and confirm it appears in both your Google Calendar and Hapee.
Your Google account, fully connected
Connection
What it enables
Where to do it
Google Calendar
Meetings synced both ways, availability for scheduling, and the notetaker joins your meetings on its own (module 16).
CRM → Calendar
Gmail / mailbox
Your emails flow into the omnichannel inbox and stay on the contact's record — the whole conversation in a single thread even if it jumps from WhatsApp to email.
Conversations → Inbox
Both are authorized with Google's button in two clicks — no shared passwords: each person connects THEIR account, and can disconnect it whenever they want from the same place.
Done when… a meeting created in Google shows up in Hapee on its own, without copying it by hand.
Heads up: this step also enables the notetaker (module 16). If the calendar isn't connected, the bot can't join your meetings on its own.
Phase 3 · 45 minutes
The AI that sells
With channels and CRM ready, the agent has somewhere to talk and somewhere to store what it learns. This is the module that changes your operation the most: take the time to test it properly.
08
Hapee Agents · your AI team
Where: menu Hapee Agents · control panel in Agents dashboard
A Hapee agent isn't a chatbot that recites answers: it's a digital employee with a role, personality, knowledge base, tools and limits. It replies on your channels, qualifies leads, books on your real calendar and logs everything in the CRM.
How to think about an agent: the 6 pieces
Piece
What it is
Example
Role
The position it holds. Defines what it does and doesn't do.
"SDR" (qualifies and books) · "Support" (resolves questions) · "Closer" (pushes the close)
Persona
Visible name, tone and traits. It's who your customer thinks they're talking to.
The measurable aim of each conversation, with its success criterion.
"Get name + neighborhood + need and book a visit" → success = appointment created
Knowledge
The document bases it can talk about. It can have several.
"Sales" base: prices and plans · "After-sales" base: warranties and returns
Tools
What it can DO, not just say. Each one is turned on separately.
Book on your calendar · create the deal in the pipeline · label the contact
Guardrails
The hard limits: what it's forbidden to do, with a fallback message.
"Don't promise discounts" · "Don't give legal/medical advice" · "Don't make up stock"
The 3 modes — and which to use when
Mode
What it does
Use it when…
Off
Doesn't reply to anything.
You're still loading knowledge.
Suggestion
Writes the reply but does NOT send it: your team sees it and fixes or approves it from the inbox.
The first week, always. It's your test run with real customers and zero risk.
Autopilot
Replies and acts on its own.
When, in suggestion mode, you've been approving its replies with almost no edits for several days.
The right path is always the same: off → suggestion (1 week) → autopilot. Skipping the suggestion stage is the #1 cause of agents being turned off within a week.
The primary agent
You can have several agents, but one is the primary: the one that automatically handles every incoming message that doesn't have another agent assigned. Mark your sales agent as primary — it's the one that receives strangers. The others (support, after-sales) are assigned to their specific channels or conversations.
Fine-tuning: how it coexists with your team
Setting
What it controls
Recommended to start
Wait before replying
Seconds it waits in case the customer keeps typing (WhatsApp messages arrive in bursts).
20–40 seconds
Max. bot messages
How many replies in a row it can give without a human stepping in.
6–8
Go silent if a human writes
If someone on the team replies by hand, the agent goes to sleep in that conversation and doesn't step on the person.
On
Wake up after
Hours after which the agent picks the sleeping conversation back up.
24 hours
Reply style
Concise · balanced · detailed.
Concise for WhatsApp, balanced for email
Images and voice notes
Whether it tries to understand photos and audio the customer sends.
On (customers send voice notes, always)
Languages
Main language and automatic detection of the customer's language.
English + automatic detection
Instructions template — copy it and adapt the highlighted parts
# WHO YOU ARE
You are [Valentina], a sales rep at [Andes Realty].
You speak in a warm, professional tone: friendly and informal, short
sentences, at most one emoji per message. You never sound like a robot
or a form.

# WHAT YOU SELL (summary — the detail lives in the knowledge base)
1- to 3-bedroom apartments in [Ñuñoa and La Florida],
from [UF 2,990]. Down payment can be financed in installments. Delivery [immediate].

# YOUR GOAL IN EVERY CONVERSATION
1. Understand what they're looking for: bedrooms, neighborhood, whether it's a first home.
2. Get their name and email naturally, not like an interrogation.
3. Offer and BOOK a visit using the calendar tool.
Success = visit booked. If they don't want to book yet, success = complete
details and the tag "future_interest".

# HARD RULES
- Never promise discounts or prices that aren't in your knowledge.
- If they ask about [mortgage financing in detail], hand off: "our
  specialist can answer that better, want me to book you with them?"
- Complaints or upset customers: hand off to a human IMMEDIATELY, no arguing.
- If you don't know something, say so and offer to find out. Never make things up.
The same four sections work for any industry: change the who, the what, the goal and the rules. A clinic hands off "diagnosis topics" to the doctor; an e-commerce store hands off "exchanges and returns past the deadline."
What a good conversation looks like
Customer · 9:47 PMhi saw the building in ñuñoa on instagram, do you have 2 bedrooms? price?
AgentHi there! Yes 😊 in Ñuñoa we have 2BR/2BA from UF 3,450, immediate delivery. Are you looking to live in it yourself or as an investment?
Customerto live in with my partner
AgentGreat — for that, the B2 model is the favorite: 58 m², terrace and storage unit. Would you like to come see it? I have slots tomorrow at 12:30 or Saturday at 11:00. Tell me your name and I'll get the visit set up.
Notice what it did: it replied right away at 9:47 PM, gave the price without hiding it, asked ONE qualifying question, and closed by proposing specific times — not a vague "would you like to book?" That's what a well-configured goal and tools produce.
Setup steps
Create the agent in Hapee Agents: visible name, SDR/sales role, chat type.
Paste your instructions, adapted from the template above.
Create the "Sales" knowledge base and upload: price list, description of each product/service, coverage, hours, payment methods and the answers to your 10 most frequent questions. Short, specific documents work better than one giant PDF.
Turn on its tools: book on calendar (choose which), create deal in the pipeline and label contact. If any of them makes you nervous, mark it requires approval: the agent will ask permission before running it.
Turn on the guardrails from the library that apply (don't promise discounts, no legal/medical advice, no third-party personal data) and write your own if your industry needs it.
Adjust the fine-tuning with the table above.
Set it to suggestion mode and mark it as primary.
Test it with the checklist below before even thinking about autopilot.
Test checklist — 15 questions before you let it loose
#
Ask it…
Approve it if…
1–4
Your 4 most frequent real questions.
It answers with YOUR data, exactly.
5
A bare "How much does it cost?"
It gives the price or range without dodging.
6
"Can you give me a discount?"
It promises nothing outside policy.
7
Something you DON'T sell.
It says so clearly and redirects to what you do sell.
8
An off-topic question (soccer, politics).
It politely steers back to the business.
9
"I want to talk to a person."
It hands off without a fight.
10
An angry complaint.
It empathizes and hands off immediately.
11
"Do you have availability tomorrow?"
It offers real slots from the calendar.
12
Write to it in 3 short messages, in a burst.
It replies ONCE, to the whole thing.
13
Send it a voice note.
It understands it (if you turned on audio).
14
Write to it in another language.
It switches language on its own.
15
Give it details: name, email.
They show up on the contact's record.
After takeoff: the dashboard
The Agents dashboard shows every run: what it replied, which tools it used and where it got stuck. Review it 10 minutes a week for the first 4 weeks: every weak conversation tells you exactly which knowledge document is missing. Agents aren't "retrained" — you add the data they lacked and they improve instantly.
Done when… it passed the 15-question checklist in suggestion mode and you've been approving its replies for a week with almost no edits.
Heads up: if the agent replies vaguely, 95% of the time it isn't the AI: that data just isn't in its knowledge. Before touching the instructions, check which document is missing.
Phase 4 · 60 minutes
Marketing in motion
Email, forms, social media and pages: the pieces that bring in new leads so the agents and the CRM can convert them.
09
Mail Marketing
Where: menu Marketing → Mail Marketing
Campaigns and automatic emails to your list, with open and click metrics, and everything logged on each contact's record.
Before you start
Access to your domain's control panel (or to whoever manages it)
Steps
Set up your sender: the module shows you 2–3 records to add to your domain (called SPF and DKIM). Put simply, they're the ID card of your emails — they prove to Gmail and Outlook that you sent that email and not an impersonator. Without them, your campaigns land in spam even if the content is perfect. You add them ONCE in the panel where you bought your domain (NIC, GoDaddy, Cloudflare…): copy each record as is and paste it as a TXT record. If nobody on your team manages the domain, message us and we'll sort it out with your provider in a 15-minute call.
Once the domain verifies, send a test campaign to your own email and check that it arrives with your name and your logo.
Create your first real campaign with one simple rule: a single goal per email (an offer, a piece of news, a reminder — not all three).
After 48 hours, look at opens and clicks in the same module.
Done when… your test campaign lands in your inbox (not in spam) with your sender name.
10
Forms
Where: menu Marketing → Forms
Each form creates the contact in the CRM instantly, with a tracked source: you'll know which campaign or page each lead came from.
Steps
Create a form with the minimum fields: name, phone and what they need. Every extra field you ask for costs you leads — the rule of thumb: if a field doesn't change your first reply, it doesn't belong on the form; the agent asks about it later.
Take advantage of the source: each form records where the submission came from, so create one form per use ("Website quote," "April campaign landing," "Trade show") instead of one generic form — reporting will later tell you which brings the best customers.
Embed it on your website (the module gives you the code or the direct link — the link also works for your Instagram bio and QR codes).
Connect its welcome workflow (recipe 1 in module 13): a form with no automatic reply is a customer waiting.
Send a test response and confirm the contact appears in the CRM.
Done when… filling in the form creates a new contact in the CRM with its source visible.
11
Social media
Where: menu Marketing → Social media
You plan the month's content grid, schedule the posts and Hapee publishes on its own to your accounts, with a visual calendar of what's coming.
Steps
Connect your accounts (Instagram and Facebook with your Meta login; any other networks you use, with their own authorization).
Build the grid with the weekly 3-2-1 rule: 3 value pieces (tips, data, education about your industry), 2 social-proof pieces (cases, testimonials, behind the scenes) and 1 commercial piece (an offer or direct call to action). Accounts that only post offers stop being seen — the algorithm and people punish them alike.
Schedule your first 3 posts at different times. A reference for Latin America: 8–9 AM, 1–2 PM and 8–10 PM concentrate attention; then compare with your own data in the module.
Check that they publish on their own and show up as "published" in the calendar.
Set the ritual: one monthly 1-hour session gets the month's grid scheduled. Posting "whenever we can" is the silent death of a small business's social media.
Done when… a scheduled post goes out on its own at the set time, without anyone touching a phone.
12
Funnels, sites and blog
Where: menu Websites → Funnels and Websites → Blog
Landing pages for campaigns, with a form built into the CRM, and a blog to position yourself on Google and in AI assistants.
Steps
Create your first funnel for your active campaign. The structure that converts, in order: a headline that promises the result ("Apartments in Ñuñoa from UF 2,990," not "Welcome to our real estate company") → 3 concrete benefits → social proof (a real testimonial or figure) → a short form → a single button. Anything that distracts from that button is extra: no menu, no outbound links.
Connect the funnel's form (it comes built in — verify with a test submission).
If your plan includes the blog, publish your first article answering the question customers ask you most. It's the one people are already googling.
Done when… your funnel is published at its URL and the test submission reached the CRM.
Phase 5 · 30 minutes
Automate
Everything your team does the same way twice a week can run on its own.
13
Workflows · real automation
Where: menu Automation → Workflows · visual node editor
A workflow is a living rule: when something happens (the trigger), Hapee does something (the actions), optionally with waits and conditions in between. You build them by dragging nodes onto a visual canvas — no code.
Anatomy of a workflow
Trigger → (wait) → (condition) → action → action… A contact "enters" the workflow when its trigger occurs, and moves forward node by node. In each workflow you can see how many contacts are inside and what step they're on.
Full trigger catalog
Trigger
Fires when…
Configured with…
Contacts
Contact created
a new contact enters by any route: manual, import, form, calendar or API.
—
Contact updated
any field on the record changes.
—
Tag added
someone (or an agent) puts a tag on it.
which tag
Tag removed
a tag is taken off.
which tag
Lifecycle stage changes
goes from lead to customer, etc.
from / to
Do not disturb enabled
the contact asks not to be contacted.
—
Forms and funnels
Form submitted
someone completes one of your forms.
which form
Funnel page visited
a known contact visits a page in your funnel.
funnel and step
Deals (pipeline)
Deal created
a deal is created.
in which pipeline
Stage changes
a card moves to another column.
pipeline, from/to
Deal won
it's marked as won. 🎉
pipeline
Deal lost
it's marked as lost.
pipeline
Deal assigned
it's assigned to someone on the team.
to whom
Mail marketing
Email opened
the contact opens your email.
one campaign or any
Email clicked
they click a link in the email.
campaign
Email replied
they reply to your email.
—
Email bounced
the mailbox doesn't exist or bounces.
—
Unsubscribed
they opt out of your emails.
—
Calendar
Appointment booked
someone books a slot with you.
which calendar
Appointment canceled
the appointment is canceled.
—
Appointment completed
the meeting took place.
—
No-show
the customer didn't show up.
—
System
Date
a date on the record arrives (birthday, expiration) with a configurable offset: "3 days before…".
date field + offset
Manual
you add contacts to the workflow by hand, one or in bulk.
—
Action catalog
Action
What it does
Useful detail
Send WhatsApp
Sends a message to the contact.
Use variables: "Hi {{nombre}}…". Outside the 24 h window, use an approved template (see module 03).
Send email
Sends an email using one of your templates.
Choose template, subject and sender.
Add tag
Tags the contact.
The basis of segmentation — and it can trigger ANOTHER workflow.
Remove tag
Takes a tag off.
E.g., on purchase, remove "prospect."
Create deal
Opens a card in the pipeline.
Set the pipeline, initial stage and amount.
Move deal
Moves the card to another stage.
E.g., appointment booked → move to "meeting."
Assign owner
Gives the contact or deal an owner.
Fixed or round-robin across the team.
Update field
Writes a value on the record.
E.g., set "source = April campaign."
Webhook
Notifies another system (advanced).
Connects with anything via Zapier/Make or your own system.
Between actions you can put waits ("wait 2 days") and conditions ("does it have tag X? yes → one path, no → another"). That's the beauty of the visual editor.
Six ready-to-build recipes
Recipe
Nodes, in order
What it solves
1 · Welcome
Form submitted → WhatsApp "Hi {{nombre}}, we got your request…" → assign salesperson round-robin → create deal in "New" stage
Nobody is left without a reply or an owner. The recipe that returns the most money.
2 · Appointment rescue
No-show → wait 1 hour → WhatsApp "we were expecting you and you couldn't make it, want to reschedule?" with calendar link → tag "no-show"
Recovers a third of no-shows without anyone chasing anyone.
3 · Quote follow-up
Stage changes (to "Quoted") → wait 2 days → condition: still in "Quoted"? → yes: follow-up WhatsApp → wait 3 days → still there: create a "call" task for the owner
Follow-up no longer depends on the salesperson's memory.
4 · New customer
Deal won → welcome email with next steps → tag "customer" (remove "prospect") → create "kick-off" task for the owner
The customer's start is always identical and professional.
5 · Cooling interest
Email clicked → condition: has an open deal? → no: AI agent WhatsApp offering to book → tag "reactivated"
Turns campaign curiosity into a sales conversation.
6 · Birthday / renewal
Date ("renewal" field, 7 days before) → reminder email → create task for the account exec
Renewals that stop getting lost to forgetfulness.
Steps for your first workflow
Start with recipe 1 (Welcome): it's the shortest and the one that shows the most.
Create it in Workflows, choose the Form submitted trigger and your form.
Add the Send WhatsApp action and write the message with {{nombre}}. Read it out loud: if it sounds like a machine, rewrite it.
Add Assign owner (round-robin if there are several) and Create deal.
Turn it on and test it yourself: fill in the form with your details and time it. You should get the WhatsApp in under a minute and see the deal created.
Only once recipe 1 has run cleanly for a week, build 2 and 3.
The golden rules of automation
Rule
Why
1 workflow at a time
Three half-tested automations create more noise than none. Turn one on, test it for a week, and only then the next one.
Always with an exit
Every automatic message must accept "I'm no longer interested." The "do not disturb" tag stops all workflows for that contact.
Wait before pushing
Two messages with a 2-day wait perform better than five in a row. Whoever pushes too hard burns the list.
Name it for what it does
"Website form welcome" and not "Workflow 3." In six months you'll thank yourself.
Check who's enrolled
Each workflow shows how many contacts are inside and where. If 40 are stuck in a wait, you designed something wrong.
Done when… you fill in your test form and within a minute: the WhatsApp arrives, the contact has an owner and the deal is in the pipeline.
Heads up: workflows and agents complement each other, they don't compete. The workflow is the fixed route (welcome, reminder); the agent is the live conversation. Recipe 5 joins them: the workflow detects the interest and the agent chats.
Phase 6 · 30 minutes
Business intelligence
The modules that keep watch for you: results, competition, meetings and public opportunities. You set them up once and they work on their own every week.
14
Reporting
Where: menu Reporting
Your Meta and Google campaigns on a single dashboard, with a plain-language reading: how much you spent, how much came back and what's worth shifting.
Steps
Connect your ad accounts (Meta Ads and Google Ads) with their authorizations.
Check that the dashboard shows your active campaigns and this month's spend.
Put a monthly review of the report on your calendar with your team — the report arrives on its own, the decision is yours.
The 4 numbers that matter (and how to read them)
Metric
What it is
How to read it
Spend
What you spent in the period.
Against your budget — no surprises at month's end.
CPL
Cost per lead: spend ÷ leads obtained.
Compare it across campaigns: the one with the lowest CPL deserves more budget… if its leads are good.
Conversion
Of those who arrived, how many did what you wanted.
If there are clicks but no conversions, the problem isn't the ad: it's the page or the form.
ROAS
Return: for every dollar spent, how many came back.
The number that sums it all up. Below 1 you lose money; the healthy target depends on your margin.
The report arrives with a written reading: what's going well, what's not and what we'd do. Read it before the charts — numbers without interpretation only cause anxiety.
Done when… the dashboard shows your real spend for the current month.
15
Competitor Radar
Where: menu Competitor Radar
You define who to watch and every Monday you get the full reading: their active ads, their website and pricing changes, their visibility in AI assistants, their social media and their press — with conclusions, not raw data.
Before you start
Your 3 most direct competitorsEach one's website
Steps
Add each competitor with their name and website. Nothing more: the radar does the rest.
Press "Analyze now" for your first report right away (the following ones arrive on their own every Monday).
Read the findings section: it's sorted by relevance, start from the top.
If a competitor has a very generic name and their ads show up as "ambiguous," set their Meta page ID in the competitors panel (the radar tells you).
How to read the weekly report
Section
What it tells you
What to do with it
Executive summary
The summary with an opinion: what changed this week and what it means for you.
Read it first. If you only have 2 minutes, this is it.
Findings
Concrete changes sorted by relevance: cut prices, launched a campaign, changed their main promise.
High-relevance ones go to your weekly sales meeting.
Active ads
How many ads each one has running and which — with a link to Meta's public library to see them.
If a competitor doubles their ad spend, something is working for them: take a look.
Comparison table
Side by side: site promise, technical signals and presence.
Spot what they're saying that you aren't.
AI visibility
How they show up (and whether you do) when someone asks ChatGPT or Gemini about your industry.
The new battle: if you don't show up, your website needs to answer your industry's questions better (module 12, blog).
The recommended ritual: Monday, 10 minutes, report in hand at the sales meeting. One decision a week based on the radar ("they raised prices → let's highlight ours this week") is worth more than filing away ten reports skimmed over.
Done when… your first report shows the active ads of at least one competitor.
16
AI Meetings · the notetaker
Where: menu AI Meetings
A bot of our own joins your video calls (Meet, Zoom, Teams), truly listens to the audio, and when it's over hands you a summary, transcript, tasks with an owner and due date, and a draft follow-up email. In sales meetings it adds a sentiment meter and insights on your presentation.
Steps
Connect your Google Calendar if you didn't in module 07 — that lets the bot join your scheduled meetings on its own.
For a one-off meeting, paste the video call URL into the module and the bot joins right away.
When the bot asks to enter the room, admit it — it appears as a participant named Hapee.
When the meeting ends, open the record: review the summary and approve the detected tasks so they're created with an owner and due date.
If you have an old recording, you can also upload the audio and it's processed the same way.
Internal vs. sales meeting — ask for the right one
Type
What it delivers in addition to the summary and transcript
Internal
Detects the commitments made in the meeting and proposes them as tasks with an owner and due date ("Camila will send the schedule on Friday" → task for Camila, due Friday). You approve and they're created automatically in the tasks module.
Sales
Adds the sales analysis: a sentiment meter for the meeting, conversation intensity, insights on your tone and presentation, objections that came up and what to improve for next time. It's like having a sales coach listening to every meeting.
The notetaker listens to the real audio — it doesn't depend on the platform's captions, so it works the same whether the meeting is on Meet, Zoom, Teams or another room with a web link. With several participants, it identifies who said what.
Done when… your first meeting has a summary and transcript in the module minutes after it ends.
Heads up: the bot needs you to admit it into the room, just like any guest. If nobody admits it within 10 minutes, it leaves and the reason is logged.
17
Public Tenders
Where: menu Public Tenders
Mercado Público filtered by real fit with your business: instead of a thousand notices, you get the ones you can actually win, with the score explained in one sentence.
Steps
Describe your business in the module: what you sell, to whom, in which regions. The quality of the filter depends on this description — compare: ✗ "technology services company" (everything matches it and nothing gets filtered) vs ✓ "custom software development and IT support for public institutions; teams of 5–50 people; Metropolitan Region and Valparaíso; we do NOT sell hardware or cabling." Saying what you DON'T do filters better than saying what you do.
Review the first batch of opportunities and mark the ones you like — the filter learns from that.
Decide who on the team reviews the alerts and how often (recommended: daily, 5 minutes).
Done when… the module shows you opportunities with an affinity score and you understand why each one fits you.
Phase 7 · Always
Day to day
What keeps the team learning and the operation orderly after the setup.
18
Academy and Community
Where: menu Academy
Short courses to master each module and the community where news, cases and answers from the Hapee team are shared.
Steps — as a student
Take the starter course for the modules in your plan — they're short pieces, designed to be watched between meetings. Progress is saved per person.
Join the Community: that's where new modules and improvements are announced before any other channel, and where the Hapee team answers questions.
Set it up — your own courses with the Studio
The Academy isn't just for consuming: with the Studio (visible to administrators) you can create your own courses. The uses that pay off most: onboarding your team (how we serve customers, how we quote, policies) and educating your customers (how to use what they bought from you — fewer support tickets).
Go to Academy → Studio and use "Create course": title, a short description and a cover (a simple image with your brand works).
Build the lessons: the length that works is a short video (3–7 min) or one screen of text per lesson. A 5-lesson course that gets finished beats a 20-lesson one that gets abandoned.
Order the lessons in the real learning sequence and publish the course.
Announce it in the Community — and in each new hire's onboarding, their first task is to complete it.
Done when… every person on the team has completed the course for the module they use daily — and your first own course is published in the catalog.
19
Repository and Roadmap
Where: menu Repository and Roadmap
The repository keeps your project's files (assets, contracts, brand material) in one shared place. The roadmap shows what's coming in your project and on the platform.
Steps
Upload your brand material to the Repository: logo, fonts, approved photos. It's where the team (and ours) will always take the right version from.
Check the Roadmap once a month: there you see what's in development and what has shipped.
Done when… the current brand material is in the repository and the team knows that's where to look.
20
The Hapee Assistant
Where: menu Hapee AI · available across the whole platform
Your copilot inside the platform: you talk to it by text or by voice and it reads your real data — metrics, customers, tasks, campaigns — and acts. It's not a generic chat: it knows what's happening in YOUR account, respects what your role can see, and remembers what you ask it to remember.
What it can do, with real examples
Capability
Ask it like this
Read your data
"How are this month's campaigns doing?" · "Show me the activity summary for [customer]" · "What tasks do I have pending this week?"
Create and schedule
"Create a task for me to review the grid on Friday" · "Schedule a post for Monday at 9 with this text…"
Generate content
"Write me 3 captions for the launch of product X" · "Draft the follow-up email for a quote sent 5 days ago"
Analyze in depth
"Do a deep analysis of [customer]'s performance this quarter" — for this it uses its deep analysis mode, which thinks longer and delivers conclusions, not just numbers.
Remember
"Remember that this customer doesn't like a formal tone" — and it applies it in the future. You can also ask it to forget something.
Read files
Upload a PDF or an image (a brief, a competitor's quote) and ask about the contents.
Three habits that get the most out of it
Ask before you search. Instead of browsing five modules looking for a figure, ask it: "how much did we spend on Meta this month?" arrives faster than any click.
Voice dictation to capture. Walking out of a meeting, press the microphone and drop your commitments on it: "create a task to send the proposal to X on Thursday." Captured.
Offload the boring work. First drafts of captions, emails and proposals: it does 80% and you polish the 20% that carries your signature.
Done when… you asked it for your first real metric and the first task it created appeared in the tasks module.
Heads up: the assistant sees what YOUR user can see — no more, no less. If a figure doesn't show up for you, it's not hiding it: your role just doesn't have it assigned.
✓ Master checklist
It checks itself off with whatever you've already completed above — and you can check items directly here. When the boxes for your plan are all complete, your Hapee is up and running.
🎉 Self-setup complete! Your Hapee is up and running: channels connected, CRM organized, agents replying and reports running on their own. Now the ritual is weekly: pipeline, radar and agents dashboard. See you in the Community.